DIY Generator
- Build Your Own Homemade Wind Generator Using Wind Energy To Create Free Electricity.
- DIY Old Washing Machine Generator
- How To Build A DIY Generator From A Lawnmower
- How I Built a Wind Generator in My Backyard for $150
- This Open Source DIY Solar Generator Unfolds Like a Flower
What is a generator?
Generator is a device that converts mechanical energy into electrical energy using the principle of electromagnetic induction. Primary mechanical energy sources can be steam turbine engines, water turbines, internal combustion engines, wind turbines or other mechanical energy sources. Generators play a pivotal role in power supply equipment. It performs three functions: power generation, rectification, voltage correction. Currently on the market are popular two types of generators gasoline and diesel generators.
 |
| Demonstration A generator converts kinetic energy into electricity with fuel as gasoline |
- Engine
- Player
- Fuel system
- Voltage regulation
- Cooling system
- Exhaust system
- Battery charger
- Control Panel or control device
Those are the pre-designed manufacturers. The natural problem is posed:
- Can you build your own generator?
- Can a fan be used as a generator?
- How can I generate electricity for free?
- Can a magnetic generator power a house?
That also means building a generator for the house.
The following section will answer the DIY Generator problem
Note:
- The above is the concept of a most common type of generator, whose output is AC, with a frequency of 50 -60Hz, voltage can be customized as 110V, 220V, 380V.
- In addition to the AC generator mentioned above, there are many other types of generators, which later for convenience, still have to use inverters to convert into AC electricity. For example solar system, Earth battery, wind generator, etc.
Blueprints for home generator
For each different type of generator, the design plans are different. Here I present the blueprint for the most common type of generator, the AC generator.
Using common knowledge in physics, we can completely build a generator. However many problems arise such as frequency of current, output voltage, generator capacity, etc. Not to mention how to wind the coil to get the desired voltage. So a blueprint is essential to DIY generators.
Here is the design:


Plan of Homemade AC Generator:
✔ The Real Nature of Tesla AC GeneratorGenerates Energy-On-Demand: Easy Power Plan Will Change Our World Forever
✔ Combination of induction motor and alternator
✔ Combination between generators
✔ Or maybe called Overunity for the system. Mother Nature doesn't care about people calling or naming phenomena. Overunity or Free Energy, or Zero Point Energy (ZPE) are just a few different words
Basic information about other DIY generators
The information below is very useful for those who are looking to make a generator for their own home. However, unfortunately it is still not the best method. Because today's understanding of electricity is the result of the suppression of truth more than 100 years ago, and the way generators are built is the result of a lie in science. However, I still collect articles for your reference. Hope useful. For the facts, please see some studies:
Even so, it's also a good idea to start with BS:
Choosing green energy as power source is not only a good decision but also an economic and sustainable one choice. Even there are available alternative sources of energy today; there are ways that have never been considered on the past. But as of the present, there is almost an unlimited possibility of creating energy and one of them is creating a free energy at home by using a DIY generator.
Over the decades, the world has been paying interest on the potentials of renewable energy. To be specific, solar and wind energies are the top two choices in devising the DIY generator. As a result of the ballooning demand for these products, the prices are starting to tag down dramatically. The components and the raw materials are readily available on local hardware stores. There is the growing industry of DIY solar generators and DIY Wind turbines. The online markets also sell these generators.
1. Build Your Own Homemade Wind Generator Using Wind Energy To Create Free Electricity.

2. DIY Old Washing Machine Generator

- old smart drive washing machine
- a piece of flat aluminium
- 3 bridge diode
- 3 bolts
- thermal grease
- old inner tube
- bolts
- pelton runner
- 25mm garden tap fitting
- water supply pipe
- pressure gauge
- pressure switch/cut off
- plastic bag
- cover for electronics
- picaxe microchip
- old hand battery drill or grinder
- battery bank & inverter
- miscellaneous tools
This can generate about 800W that is stored in your battery bank. Nelson uses his to power his fridge, 2 freezers, house lights, toaster toaster, kettle, PC, TV and even a 180 hot water heater. That’s his entire home. Personally I would build a solar water heater for the hot water and save power for other things around the house. That’s just me! 🙂
3. How To Build A DIY Generator From A Lawnmower
So you know getting a backup generator is a great idea, but you just can’t afford to purchase one? Well, could you afford $50 give or take, for a small backup generator?

If you search around at yard sales or your local junkyard or landfill you should be able to pick up most of the bits required to build this DIY lawnmower generator. There are a few extras you’ll likely need to purchase, but you could bring this in for around $50.
I have listed several different tutorials below that show how simple and affordable it is to build a basic generator out of an old lawnmower engine.
This is a really interesting and entertaining video tutorial. I think a lot of the build is overkill, but it does give you an idea of what can easily be accomplished with some cheap/free scrap parts and a little DIY skill. I particularly like the fact the generator was built onto the frame of the lawnmower, rather than removing the lawnmower engine and mounting it on another base.
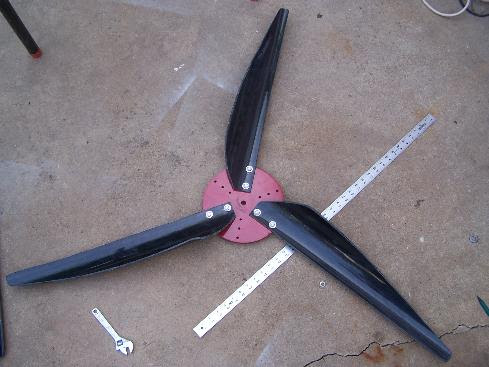
4. How I Built a Wind Generator in My Backyard for $150
Videos
Six-bladed design (low startup speed and lots of torque, but slowest):
Wide-bladed design (good startup speed, but also very slow):
How does my wind generator work?
Every wind generator, whether they produce enough energy to power a city or to power a small radio, works on these same basic principles...
1. The wind blows
2. The generator's vane (tail) causes it to turn into the wind
3. Blades attached to an alternator/generator experience the force of lift and begin to spin
4. The spinning creates electricity for us to use directly or to charge batteries
Sounds pretty simple eh? Well, then how the heck do I build one? Read on...
Tools Required
Surprisingly, building a simple wind generator only requires very basic hand tools, and if you are desperate you won't necessarily need all of them. I used...
Jigsaw (or a hacksaw and a lot of determination)
- Drill
- (2) Drill Bits (1/2", 7/32")
- Tape Measure
- Crescent Wrench
- Pipe Wrench
- Protractor (to measure angles for the hub)
- Sandpaper (various grits)
Parts Required
I wanted to be as minimal as possible with my design (I'm poor), so I took the already simple designs from around the web and made them even simpler. All of the parts are available at any local home improvement or hardware store, and the entire setup can be constructed in as little as a weekend. Many of the parts you may already have lying around, and lots of substitutions can be made (instead of 1" steel pipe for the tower, you could use an antenna pole for instance). Here are the parts I used to build my generator...
- 10" x 14" Steel Sheet
- 10" x 1/4" Steel Nipple
- 1-1/4" Floor Flange
- 36" x 1" Square Tubing
- 1/2" Bore Circular Sawblade (for hub)
- 5/8" x 1/2" Arbor (to attach sawblade to motor shaft)
- (2) Hose Clamps
- 8" x 4" PVC Pipe
- 30" x 8" PVC Pipe (6" pipe works well too)
- A DC Permanent Magnet Motor (preferably Ametek 30V or 260V 5A treadmill motor)
- (8) 1/4" Bolts (with washers and nuts)
- (2) 1/4" Sheet Metal Screws
- 10-40 Amp Diode (the bigger the better)
All of the above parts (with the exception of the motor), can be picked up in a single stop to any large hardware or home improvement store. For the motor, the most popular types are old tape drive motors manufactured by a company called Ametek. The key is to finding a motor that puts out the highest voltage per RPM. For instance, the Ametek I'm using is rated for 30V at 325 RPM, making it excellent as an electricity generator (for a nice output comparison of the Ametek motors commonly found on eBay and other sites see TLG Windpower). However, pretty much any permanent magnet motor with a good volt/RPM ratio will do. Keep in mind that if you want to generate useful electricity, you will need to produce at least 12V to charge deep cycle batteries or run an inverter. My setup can easily achieve 300-400 RPM in a pretty average wind (for Oklahoma). These instructions assume an Ametek motor with a 5/8" shaft, but can easily be adapted to other motors (search ebay for "wind generator" and you will get a listing of lots of good motors).
- The longer your blades are the more "swept area" you have to gather energy from and easier your blades will spin in low winds, but the slower your rotation speed will be
- The tips of the blades always spin faster than the base, therefore one needs to take into account the "tip speed ratio" (TSR) when designing blades (there is a reason why old farm windmills will spin all year long at 40RPM)
- The power that can be extracted from the wind increases by the cube of wind speed (something like P=k*v^3 k=constant of wind generator, v=wind velocity)
- According to the Betz Limit, only about 59.3% of power can be extracted from the wind (so in reality P=.593*k*v^3, assuming k accounts for mechanical inefficiencies in the generator motor)
- The higher you get the generator off of the ground, the more wind it will be exposed to (the general recommendation seems to be 25-50ft., but I've had decent results at just 12ft.)


Hub & Blade Assembly

Tail & Pivot Assembly


Tower Assembly
- (2) 5' Sections 1" Pipe
- (1) 1" Pipe Coupling
- (3) 1" Pipe Elbows
- (4) 18" Pipe Sections
- (2) 12" Pipe Sections


Finished Product


5. This Open Source DIY Solar Generator Unfolds Like a Flower

At POC21, the team created SunZilla 3.0, a somewhat smaller, modular prototype that allows users to adapt the device to their own needs. The device’s solar panels fold out of a central module, and two separate modules house the unit’s electrical system and battery power storage. The new prototype’s simplified design, portable scale, and readily available materials make it easier to build and accessible to more people than its predecessor.

- DIY Old Washing Machine Generator: https://homesteadlifestyle.com/diy-old-washing-machine-generator/
- Use Permanent Magnets to Create Free Energy Generators: https://energy-medicine-blog.blogspot.com/2020/12/use-permanent-magnets-to-create-free-energy.html
- Magnetic Generator: https://homemade-generator-tao.blogspot.com/2021/08/magnetic-generator.html
- Build Your Own Homemade Wind Generator Using Wind Energy To Create Free Electricity. https://www.brilliantdiy.com/build-your-own-homemade-wind-generator-using-wind-energy-to-create-free-electricity/
- How To Make A Magnetic Generator At Home: https://homemade-generator-tao.blogspot.com/2021/01/how-to-make-magnetic-generator-at-home.html
- How To Build A DIY Generator From A Lawnmower: https://knowledgeweighsnothing.com/build-a-diy-generator-from-a-lawnmower-total-project-cost-40/
- How I Built a Wind Generator in My Backyard for $150: http://www.thekevdog.com/projects/wind_generator/
- Tesla Generator Bueprints: https://homemade-generator-tao.blogspot.com/2020/07/tesla-generator-bueprints.html
- This Open Source DIY Solar Generator Unfolds Like a Flower: http://www.thekevdog.com/projects/wind_generator/
Plan of Homemade AC Generator:
✔ The Real Nature of Tesla AC GeneratorGenerates Energy-On-Demand: Easy Power Plan Will Change Our World Forever
✔ Combination of induction motor and alternator
✔ Combination between generators
✔ Or maybe called Overunity for the system. Mother Nature doesn't care about people calling or naming phenomena. Overunity or Free Energy, or Zero Point Energy (ZPE) are just a few different words


